


 Hi Bold Bakers! Its kind of hard to believe
but Bigger Bolder Baking is 2 years old today and we are going to celebrate by making the
most impressive vanilla birthday cake with buttercream frosting. So lets get baking.
Over the last two years, weve built up a really good repertoire of recipes but today
I want to show you a master recipe for vanilla cake and for buttercream frosting. They are
two recipes that every bold baker must have to hand. Were going to start out by mixing
together our wet ingredients.
In a jug, add in your egg whites, a whole egg, milk, and
vanilla extract. And then just whisk them all together until theyre combined. Ok
thats our wet ingredients. Were going to set these guys aside and get started on
our dry ingredients.
For our next step, Im going to mix my cake on my stand mixer, but
dont worry, you can also mix this cake easily by hand. Into my bowl, Im going
to add in my flour, sugar, baking powder, and salt, and then just give them a quick
mix up with a spatula. Into our dry ingredients, were going to add in our cold, cubed butter.
So now were going to turn on our machine to medium low speed and were going to let
the paddle actually work the butter into the flour and youre going to end up with fine
bread crumbs. Now I know this technique is a little different from what weve done
before, but adding in the butter this way, it makes it nice and small and gives your
cake a different crumb and makes it nice and buttery.
And remember you can also rub in
the butter by hand no problem. And this is what it should look like. There are some little
lumps of butter, there are some finer pieces. This is perfect, this is what were looking
for.
So now were going to turn our machine back on to medium speed and were going
to add in our liquid. All were doing here is mixing until our batter forms and theres
no more lumps. It only takes a minute or two. And there you have it, thats our cake batter.
You want to run a spatula underneath to make sure theres no dry bits, but thats what
were going for.
Ok great, now were going to take this batter and get it into our cake
tins. So Im baking our cake in three, six inch tins because I want to get it nice and
high. But dont worry, you can also bake it in an 8 or 9 inch tin and also, it can
be baked in cupcake tins. Into a buttered and lined tin, divide your cake batter evenly.
You also dont have to use three tins like I am.
You can always bake it in one and just
slice your layers. I can already tell these cakes are going to be big and bold, I cant
wait to see them. Were going to pop this guy into the oven now at 350 degrees Fahrenheit
or 180 degrees Celsius until theyre firm on top and lovely and golden brown.
While the cakes are baking, were going to get started on our buttercream frosting.
Now I know a lot of you find buttercream frosting hard, and I found it hard when I first started
baking. But if you just follow my tips and techniques, I guarantee you will have a fool-proof
buttercream frosting every time.
Im going to put this recipe with instructions and the
recipe for the cake on biggerbolderbaking.Com. Into your stand mixer, add in your room temperature
butter. A really important tip is that your butter is room and soft but not melting. You
want to get a nice texture.
Were going to turn on our machine to medium high speed
and cream up your butter. You want it to get nice and fluffy before you add in your sugar.
You can also make this frosting using an electric hand mixer, but its very difficult to do
by hand. This is what you want your butter to look like. Its pale, its grown in
volume, it is the perfect texture to start adding in the icing sugar.
So now were
going to turn back on the machine to medium high speed and were slowly going to add
in the sifted icing sugar spoonful by spoonful until its all gone. If I can give you one
bit of advice about adding the icing sugar, dont let the spoon get too close to the
paddle because Ive done that many times. Ok great its looking good. All of our sugar
is in there.
Its kind of grown in volume. Its nice and soft. So were just going
to go in with a spatula and scrape down all of that icing sugar. Perfect.
So to flavor
this, were going to add in some vanilla extract, some salt, a little bit of milk,
and also I have some vanilla seed so Im going to add them in there too. Itll make
it look really nice. Now that weve got our flavor in there, Im going to turn the
machine back on to high speed for around 3-4 minutes and let it all whip up and then were
ready to go. This buttercream recipe can be made in advance and be kept in your fridge
for up to two weeks so its really great.
Ok I can tell that this is done. Look at this.
This is how your buttercream should look. Light and fluffy, white, full of air, and
thats the reason we beat it up so much. Some people say to me that their buttercream
frosting tastes like butter, it absolutely should not.
It should taste like air. And
thats the reason we keep on beating it. If it still tastes like that, then keep it
going on that machine. This is perfect, it tastes like a fluffy vanilla cloud.
Its
going to great with our cake. I just heard our timer go off there so were going to
set this aside and go check on our cakes. These cakes look great, theyre a lovely
golden brown on top and theyre nice and firm in the middle which says that theyre
done. And you can also tell because its pulled away from the edge of the tin.
So this
is my favorite part, the decorating. When everything comes together. Now I made this
cake yesterday because its always best to decorate maybe day old cake because it
doesnt get as crumby and it looks much better. Also, you can make this cake in advance
and freeze it, have it in the freezer for maybe three weeks and then pull it out whenever
you need it.
Before we start frosting our cake, were going to even out the layers
to make sure that everything is level and smooth and it frosts much better. So if you
have a little bump on top like I do, take a knife and just cut as straight across as
possible. And then just remove that lump and then you end up with a nice level top. Now
that we have our cakes leveled off, were going to start to decorate.
I actually like
to decorate mine on a little bit of a turntable because it makes it really easy to frost.
If you dont have one, dont worry about it. Put a nice dollop of buttercream in the
center of your cake. And then with your spatula, were just going to move it all the way
around to the edges. I like my buttercream to be nice and thick.
And try to get it as
even as you can, I know its not easy but you know what? The less you think about it,
the better of a job youre going to do. Now go on with your next layer and just continue
frosting as before. Ok now on with our last layer. Now what I like to do is use his bottom
as his top, so you get a lovely even layer when it comes to decorating.
Just look at
that, it looks fantastic. So our next layer is our crumb layer. Now this a really important
step because it catches all of the loose crumbs so it wont make its way into your final
decorating of your cake. So all you want to do is put your frosting on top and work it
around the top of your cake all the way down the sides.
Were just doing a thin layer
all over trying to catch any loose crumbs. This is just a rough layer. What this also
does is make your cake nice and straight and even, which is something I had trouble with
cakes in the past until I started doing this method. As you can see, its catching up
all the crumbs because we dont want those in our finished product.
And that is our crumb
layer. It actually looks pretty good right now. But what were going to do is take
this cake and pop it in the fridge and let this icing go cold and set. Itll take around
20 minutes to half an hour.
Itll make it much easier to decorate on this once its
cold. Our cake has been in the fridge for half an
hour and our crumb layer has set. You can tell because its nice and firm underneath
your finger. Now were going to go ahead and put on our last coat of buttercream frosting
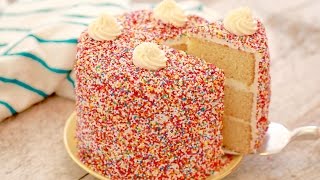
and then were going to cover it with sprinkles.
I always like to start at the top of the cake
decorating so I can work it down the sides. And like I said before, the faster you move,
the better your result. Continue around the cake with a nice thick layer of buttercream
frosting. We have every patch, every little space of cake covered in frosting.
It doesnt
look perfect but dont worry about it, our next is to cover it in sprinkles and as we
know, sprinkles cover a multitude of sins. To decorate your cake with sprinkles, start
by pouring them all over the top and then for the sides, youre just going to have
to take handfuls of sprinkles and pretty much just throw them at the side of the cake and
make them stick. One important tip is to put a baking tray down underneath the cake so
it catches all of the sprinkles so you can just reuse them and throw them back on. Now
Im pretty sure you can already see why I love this method, of decorating.
Number
one, because its super easy. Number two, because you dont have to be a perfect cake
decorater to be able to do this. It is a great way to decorate an impressive cake. And there
you have it, in just minutes you have a big and bold birthday cake.
It looks insane. The
thing about this cake is that it doesnt need a whole lot so Im just going to pipe
some rosettes of buttercream on the top. And then look at this. How fantastic, what a great
celebration cake.
Perfect for bigger bolder bakings birthday, perfect for your birthday.
This technique for decorating with sprinkles is so fast and easy, I know youll be able
to recreate it. Now Im going to cut out a big slice. With a serrated knife, cut yourself
a generous slice of this beautiful cake. Look at all those layers and those sprinkles.
I
love the colors and the contrast. It looks fantastic. This cake is soft and moist and
the taste of vanilla is just gorgeous. It reminds me of birthday cakes I used to have
when I was growing up.
Thank you so much for the great support over the last two years
and being part of the bold baking community. I couldnt have done it without you. 2Nd
Birthday! Yay!.
 - Sometimes you just get that
 Finely chop the onions, parsley into small pieces. Chop the tomatoes & keep it aside. In a large mixing bowl, add
 HI everyone and welcome back to my channel.
 - Don' be scared. Don't be mean. Today you're gonna need a ramekin. Hello, everybody.
 Howdy folks how's it going welcome to my virgin
 Horns up and welcome to a brand new episode
 Today on The Stay At Home Chef I'm showing you how to make The Most Amazing Chocolate Cake This is the kind of chocolate cake I image the fat kid ate in Matilda. It is so moist and so good! We're going to start by preheating the oven to 350 degrees F. And then I'm going to show you how to butter a 9-inch pan. Put some softened butter onto a paper towel and then spread it around the bottom and sides of the pan.
 Hey my lovely foodies! Welcome to Kanak's Kitchen Today I am going to show you a very easy recipe That is Veg Pulao. It is an easy, quick and healthy rice preparation with full of vegetables and spices in it This is one of the most comfort food which I feel everyone enjoy's in the meal. This recipe is requested by a viewer named Padma Gopinath. So Padma here is the recipe for you Ingredients First heat oil or ghee in a wok To this add the whole garam masala Bayleaf, then the cloves, cinammon stick Green cardamom and the black cardamom Smash a bit with your fingers Add the cumin seeds Stir this and when they are fried enough, add onions to it When onions starts to become little transparent, add in ginger garlic paste to it Saute it for a while Next add in the green chillies Again stir it Now put all the vegetables over here Potatoes, some carrots, cauliflower, peas and beans You can use any other vegetables of your choice Saute the vegetables for around 2-3 mins on low to medium high heat.
 This recipe makes the softest fluffiest pancakes
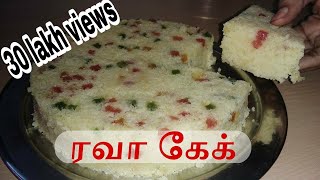 Hi, welcome to Raji's Kitchen. Today we are going to see how to make Rava cake (Egg less). Ingredients 1.5 Cup Rava, 1 cup Sugar(Powered) 3/4 Cup milk, 1/2 Cup curd, 1/4 cup ghee Measure everything with the same cup I measured with this one 1/4 tspn Baking soda, 2 pinch baking powder 2 pinch cardamom powder Tutti frutti as you like If you dont like it you can use nuts instead. Now lets see how to prepare rava cake First take curd and mix it hard Mix it until it becomes very smooth Now add everything else one by one Rava Powdered Sugar Ghee Add milk little by little Mix it until in becomes very smooth The Rava i took today was very small If yours is big in size grind it in mixy Batter shouldn't be too watery or too hard Make it like this Keep it aside for 15 mins Its been 15 mins.
 Today I will be making vegetable curry. This is an everyday basic recipe. Vegetables simmered with tomato gravy makes a very colourful and satisfy dish. This is a very delicious dish.
 Hello foodies, I'm your chef Kanak and I welcome
 Hi my lovely viewers, welcome to my channel Today I am going to show you one of my favorite snack which is inspired by the famous cartoon character Doraemon and I am sure most of the mothers must be aware of it and yes I am talking about Doraemon's favorite food that is Dora cakes. It is also known as Dorayaki or Dora pancakes Dora cakes or Dorayaki is a very popular Japanese snack in which 2 small pancakes are sandwiched with the sweet red bean filling in it which comes out quite soft and fluffy. So let me show you how to prepare this yummy pancakes which I will be stuffing with some nutella or chocolate spread in it as a dedication to this coming Children's Day. So over to my kitchen to see what you need for this Ingredients First in a large bowl, combine the eggs with sugar in it Beat it well until it is well blended Sugar should be completely dissolved Blend it for around a minute Next add in the vanilla extract Mix it well Add in the all purpose flour along with honey Blend it until it is smooth and free from any kind of lump Now take the water in a bowl Stir in the baking soda Mix it well until it is completely dissolved Pour this prepared soda water into the batter Again beat it well for another 30-40 seconds Do not overbeat it.
 (Lively music) - We're in Inglewood, California. We're gonna eat a bunch
 Hey guys, its Ro! Today we are gonna be making something that
 Carrot cake is a classic. A light and fluffy cake flavoured with shredded
 [Candice] today on The EdgyVeg, i'm going to show you how to turn this ordinary piece of rice paper [candice] into the best VEGAN BACON you've ever had! [Candice] don't believe me? Let me prove you wrong! [Candice] and make sure you subscribe for salty, delicious bacon! [Candice] now i've seen this done a couple times online and i've tested them out. [Candice] and after about five attempts at doing it, i came up with my own recipe and my own technique. [Candice] to make the bacon marinate, we are going to take a bowl and a whisk. [Candice] and we are going to whisk up some tamari, [candice] olive oil for greasy bacon goodness.
 Hi guys, Boy have I got a treat for you


